

Today I will explain about Hikvision camera, NVR & Switch connectivity step by step.
Nowadays cameras, NVR & switch configurations are everywhere In
Enterprise solutions like any office Network, Road Traffic signals,
Shops, warehouses, banks, big malls & any
other corporate sector.
if you are working on any projects Don’t worry, we will guide you step
by step in detail. As even if you need any remote support just write a comment
or send us an email our expert will support you remotely.
Below are our targets
- ·
NVR & Camera installation & power-up
- ·
SADP Tool
- ·
Camera activation & Connectivity
- ·
Changing the IP of the camera
- ·
Initialize NVR & Add cameras
let me explain the Hikvision NVR DS-7700 Series
and DS-2CD2163G2-I (2.8mm) 6MP camera model but almost the same
procedures for any other Hikvision NVR & Camera model.
Camera model DS-2CD2163G2-I picture below

Below is the Box picture of the Hikvision NVR DS-7700 Series

NVR Front side picture:

NVR Back side picture:
There are two LAN-1 & LAN-2 ports, HDMI, Audio,
alarm & one power port.

After power-up of NVR & connected the Camera to the
POE port of the switch.
Let's Start
There are two methods to activate the Hikvision POE camera
- ·
Connect the camera through the POE adapter with Laptop
directly
- · Connect camera & laptop both connect with any POE
Switch
Method-1:
Camera connected through POE Adapter:

Method-2:
Camera connected through Switch:

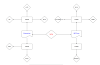
After connectivity with any of the above methods now
download & Run the SADP
Tool.
The default IP of the Hikvision Camera is 192.168.1.64/24 assign 192.168.1.65/255.255.255.0 IP to your laptop
to become in the same subnet.
Run the SADP tool will receive the Connected
camera IP 192.168.1.64, click/check on the inactive camera

After clicking on the inactive camera first time, the menu will
automatically open on the right side, you need to set the password as below
picture

The default username is admin & the password you
need to set for the first time.
Then click on
activate this way the camera will be activated.
Note: You can change IP Address as per customer requirement
by clicking on modify on the top of SADP Tool or it will show the menu page on the
right side to edit.
By changing the IP Address of the camera assign NVR IP
as a Gateway.
After activating Camera now, you can access it through
a Web browser by putting the camera IP Address.
Initialization of Hikvision NVR:
The same process will be followed for NVR
initialization as connecting Laptop with NVR directly with the LAN port on the back
side of the NVR but this time access through the Web browser directly or can be
accessed through the SADP tool for changing the IP Address.
Access Hikvision NVR first time through the Web as
below,
Set password & click on activate

Write Basic security questions & email id.

Now change the IP address of NVR by clicking on configurationàNetworkàBasic settings

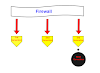
Add Camera with NVR:
For adding the camera in NVR, the first important
point is Both Camara & NVR must be connected with a switch & configure the
laptop in the same Network.
In some NVR models, there are LAN ports we can connect
the camera directly to NVR without a switch.
Below picture for reference

Now ping NVR & Camera IP from Laptop CLI.
Access NVR in the Web browser
Go-To configurations --à then Click Systemà Camera management àAdd

After clicking on add below a new page will be opened
then fill in all option like the IP address & password you set for the
first time

If you are interested in the configuration of Dahua, Huawei Camera, NVR
& IVS, click the required tab under Camera & NVR.

In the Next post
of the Hikvision section, we will cover how to connect & configure the Hikvision
Face recognition terminal & Door access control system.
Interview Questions:
·
What is the default IP of Hikvision Camera & NVR?
·
How many channels in Hikvision NVR?
·
Maximum how many cameras will be connected with Hikvision
NVR?
·
Which port number is used by Hikvision NVR?

0 Comments